How to publish your NodeJS application on Homebrew
Learn how to publish NodeJS CLI application on the popular Homebrew package manager using Github
Homebrew is the de-facto package manager when it comes to macOS. It is quite easy to publish your projects on Homebrew without any ruby knowledge.
A couple of years ago, I developed a small CLI utility called getfilesize-cli. It displays the file size in a human-friendly way. This package is published under npm registry but to use this tool the user has to have NodeJS runtime installed in the system. As an author, I should make the application easier to install and consume by the users. Therefore, I consider publishing it apart from npm registry.
In this article, I will be showcasing the publishing process used for my tool, getfilesize-cli.
Preparing the binaries
The first step is to create a standalone executable binary where the NodeJS runtime will be baked inside the binary file. For this, I made use of an awesome tool pkg by Vercel.
npm install pkg -g
pkg package.json
This will take package.json as input and bundles all the dependencies along with the NodeJS Alpine runtime.
You can also configure the packaging behavior by adding the following in the package.json file.
"pkg": {
    "targets": [
      "node14-linux-x64",
      "node14-macos-x64",
      "node14-win-x64"
    ],
    "outputPath": "release"
  }
You will now have a binary executable in the release/ directory, in my case:
<root>/releaseCreating Tar File
Homebrew expects a TAR archive, and it’s easy to create one using the commands: In my case
cd release
mv getfilesize-cli-macos getfilesize
tar -czf getfilesize.tar.gz getfilesize
At this point, you should have the getfilesize.tar.gz file in your release directory.
We also need to get the hash of this tar file while we create Homebrew formula.
We can calculate easily that using
shasum -a 256 getfilesize.tar.gzCreating GitHub Releases
Homebrew requires a URL to download your binary. There are plenty of ways to host your executable, but for my project, I used GitHub Releases, mainly because it’s free, easy to use, and my project is hosted on it.
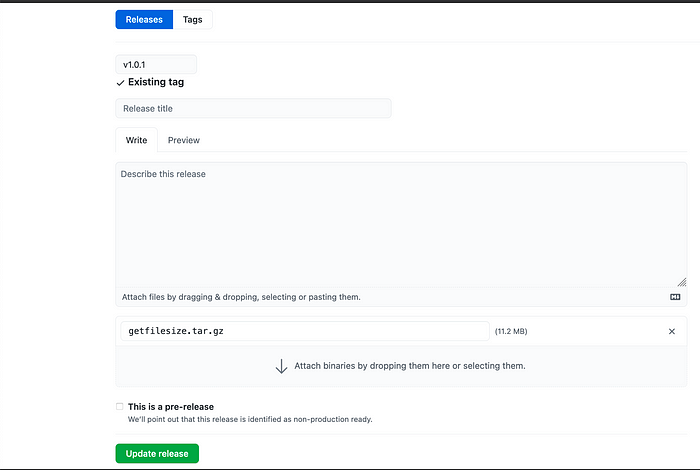
Open your project’s GitHub page, navigate to the Releases section and then click on Create a new release.
Insert a tag version, such as 0.0.1, a title, and then drag the previously created archive ( in my case getfilesize.tar.gz ) into the upload section. You should have something like this:

Now click Publish release to publish the release.
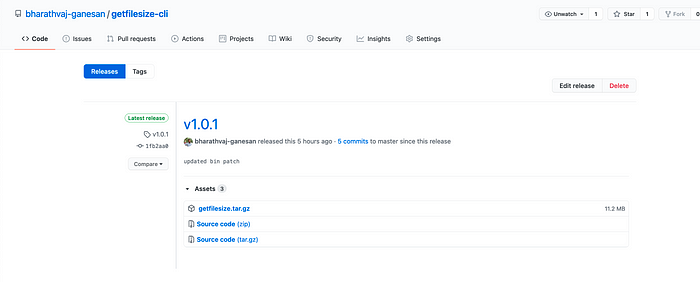
On the Release page, you’ll need to grab the archive URL. Expand the Assets section and copy the URL of the getfilesize.tar.gz archive you’ve just uploaded. In my case:
https://github.com/bharathvaj-ganesan/getfilesize-cli/releases/download/v1.0.1/getfilesize.tar.gz
Save it somewhere, we will need it later.
Preparing the GitHub Repository
Homebrew offers a way to create third-party repositories via Taps. In a nutshell, Taps are just GitHub repositories with specific names and a few configuration files.
We will need to create one to host our project as follows,
homebrew-<projectname>Where project name is the name of your project. In my case it is homebrew-getfilesize
Creating the Formulae
Please clone the homebrew-getfilesize repository created in the previous step in your local machine. Now you will need to create a Homebrew Formula for your project, a very simple Ruby file containing the instructions to install your binary on the user computers.
Please note that Ruby knowledge is not required here. (I don’t know ruby, psst… don’t say to anyone)
We will need to create the following folder structure,
Formula/
    - getfilesize.rb
 - README.md
In the getfilesize.rb file, paste the following content:
class Getfilesize < Formula
  desc "Get Human Readable file size information. - CLI"
  homepage "https://github.com/bharathvaj-ganesan/getfilesize-cli"
  url "https://github.com/bharathvaj-ganesan/getfilesize-cli/releases/download/v1.0.1/getfilesize.tar.gz"
  sha256 "6c03100f5b1f8e61f5d49efab759a2efcdbcc4ac2677fcf98e7317ec660e6994"
  license "MIT"
  version "1.0.1"

  def install
    bin.install "getfilesize"
  end
end
Here,
desc — A short description of the package. You can reuse the same from package.json
homepage — The URL of the repository.
url — The path where the TAR file is hosted. The one we got from the release page.
version — Your package version. The one you entered while creating GitHub release
license — License of the package
And finally, change getfilesize with your binary executable filename, obtained from the first section:
def install
    bin.install "getfilesize"
end
Now commit and push your changes to GitHub remote.
Installing the Package
All right, if you are with me till here, your users are ready to install the package using Homebrew:
brew tap bharathvaj-ganesan/getfilesize
brew install getfilesize
Where <user-name>/<repository-name> is your GitHub username combined with the project name. You can ignore the homebrew- prefix while installing and tapping the Formula.
Next Steps
This was a very basic way to publish your package on Homebrew, but things can get much better. In fact, we can automate the packaging process via Github Actions. DM me if you would like to discuss more on the setup.
If you liked the article and want to stay up to date, follow me on Twitter or GitHub.
